With our plugin ISPConfig Automail you can automatically configure email clients like Thunderbird or Outlook.
If you use one or more mail servers for the domains makes no difference. Just define the appropriate data such as host name and port for each mail server. everything else is done through a small web page that provides an Autoconfig service (Thunderbird) or Autodiscover service (Outlook).
Autoconfig and Autodiscover request XML files via different addresses, to configure the email client according to your specifications.
To use the ISPConfig Automail, you only need a current version of ISPConfig and a website (Apache or nginx).
The plugin consists of two parts
- the interface plugin for ISPConfig to manage the settings
- a script to generate the relevant XML documents under the respective domain
In this example example.com is your domain, over which the automatic setup of the mail clients will run. You are free to choose this domain. The domain client.com is the domain that queries example.com for the setup.
Install ISPConfig Automail
cd /tmp wget https://download.schaal-it.net/ispconfig-automail.tgz tar xfz ispconfig-automail.tgz cd automail php install.php
Activate the plugin
Log in to ISPConfig as admin, go to System / CP User and activate the module automail for the user admin. After you have logged off and on again, the module is available for you.
Remote-User
Create a remote user who can use the “automail functions”. If you have a multi-server setup, you may need to allow remote access.
Configure the plugin
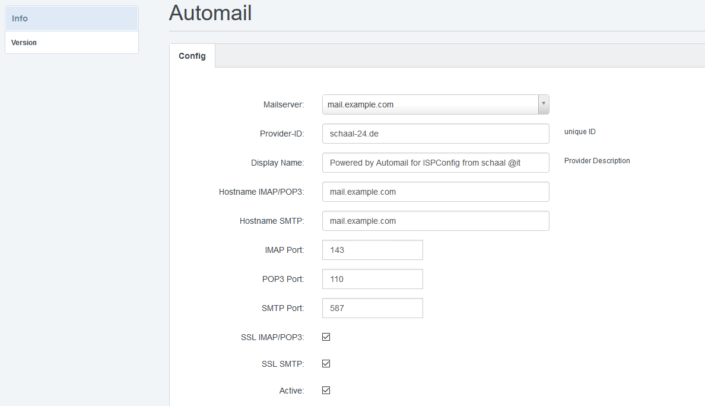
Under Provider-ID you enter a unique ID that identifies your setup. You can use the domain name of your server.
The two Hostnames are the names by which mails are retrieved (IMAP/POP3) and sent (SMTP). If you run everything on the same server, you must enter the same name in both fields.
For Ports, enter the ports that should be used for your mail server.

Create the required DNS records
You need an A-record for autoconfig.example.com and autodiscover.example.com pointing to your web server. If you use IPv6, you should also create AAAA records.
Create two entries in each customer domain. A simple CNAME is enough for autoconfig:autoconfig.client.com. CNAME autoconfig.example.com.
For autodiscover an SRV record is recommended. This will give you a certificate warning during setup, but it is the easiest way to set up any number of customer domains:_autodiscover._tcp.client.com. SRV 0 0 443 autodiscover.example.com.
Create the website in ISPConfig
Now you have to create the website autoconfig.example.com with PHP support and without auto subdomain in ISPConfig. You should also secure this site using SSL. This is not required for autoconfig, but will be needed later for autodiscover. You can easily use Let’s Encrypt
You have to set the directives for Apache or nginx accordingly:
Apache
ServerAlias autoconfig.*
nginx
location ^~ /config\.php { deny all; }

location / {

rewrite autodiscover\.xml$ /index.php last;

rewrite Autodiscover\.xml$ /index.php last;

rewrite config-v1\.1\.xml$ /index.php last;

}

server_name autoconfig.*;
With alias or server_name this domain can be used later by any customer or email domain.
Create the alias domain autodiscover.example.com and point it to autoconfig.example.com. You don’t need any redirects, the important thing is that the domain has an SSL certificate. A-Records in DNS are enough to point to your web server so you can use Let’s Encrypt.
Upload the script to the webseite
Upload the files from the website directory from the archive to the newly created website and adjust the data in config.php. Rename the htaccess to .htaccess. If you use nginx, you can also delete the file directly.
Test
You can easily test Autoconfig via wget:wget http://autoconfig.client.com/config-v1.1.xml?emailaddress=test@client.com -O test
In the file test you will find the result. The email address must exist of course.
For Autodiscover there is the Microsoft Remote Connectivity Analyzer.
